

So we touched upon the basic of how a color wheel is made in lesson 101 and how to make a a gradient and blend in lesson 102.. This week we will look at how to use the wheel to pick complimentary colors.
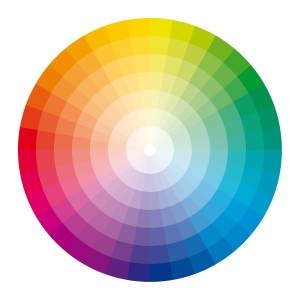
Here we have the basic 12 hues of the color wheel.

Lets start with the easiest. The color wheel has 2 sides Warm colors and Cold colors.


…………………………………………………………………………………………………………………………………..
Complimentary colors in theory are those which are directly opposite each other on the wheel. Designers when using (2) complimentary colors tend to use one dominant color for the background and the other to highlight the most important elements.

Here are a few possible combinations


………………………………………………………………………………………………………………………………….
Analogous Colors are those colors which lie on either side of any given color. These usually match well and create a serene and comfortable design

Here are a few possible combinations


……………………………………………………………………………………………………………………………..
Triadic colors uses the power of three colors which are situated 120 degrees from each other. Triadic colors are considered to some of the best color combinations.

Here are few examples


…………………………………………………………………………………………………………………………………
Square Colors are colors that are evenly spaced apart on the wheel.

Here are a few examples


…………………………………………………………………………………………………………………………………….
Remember there are many more colors to a color wheel, We only used the basics here. I used hues for the examples above, which we discovered in lesson 101 are the brightest colors in a wheel, we also have tones, tints and shades to factor in.
Here are a few mood boards that uses one of the theories above. Can you guess which ones? Pippinettes is your homework this week is to find an image that uses one of the color theories above. Post it in the club and enter this weeks giveaway..


Reblogged this on It's Crochet O'Clock and commented:
Moving on to lesson three! If you haven’t been following this series you should absolutely click through to Pippin Poppycock’s website and start.
LikeLike
Although I’ve looked at these principles many times – you have explained it very well
LikeLike
I’m really enjoying these lessons. Can’t wait for the next one. It would be useful to have a printable version to save in my binder.
LikeLike
I can most definitely create a printable version. I’ll wait until all 5 lessons are complete and create an ebook for everyone
LikeLike
Thank you!
LikeLike
Thank you. There is a lot to consider and have a print version will surely help. Thank you.
LikeLike
Very clear and bright explanation, it’s a joy with all the colourful pictures. Thank you for the work you put in it🌺Margriet
LikeLike